Many organizations have enormous values in data stored in relational databases, but it is often slow to analyze. Calculating things like correlation coefficients or analyzing trends can take many minutes or even hours using a regular SQL database. Wouldn’t it be nice to be able to do it in seconds or even in milliseconds?
As some of you know, Speedment is a modern Java ORM that is built around the new functionality of Java 8 and 9, like Streams. The enterprise edition allows Java developers to easily run typesafe queries on an off-heap in-memory view of the data, without running into garbage collect limitations even when aggregating hundreds of millions of rows. In this article I will show you some nice examples of analytics that can be performed using these tools.
Correlation Analysis in Spring
This article explains how to write a Java Spring application that queries a database of salary-entries to calculate a correlation analysis like this:
{
  "M": {
    "count": 1706321,
    "salaryMean": 63838,
    "daysEmployedMean": 2562.9950696092446,
    "salaryVariance": 287120292.49482954,
    "daysEmployedVariance": 2521092.66062704,
    "correlation": 0.38346220360987127
  },
  "F": {
    "count": 1137726,
    "salaryMean": 63769,
    "daysEmployedMean": 2562.467887479722,
    "salaryVariance": 283750106.3594864,
    "daysEmployedVariance": 2515737.630249606,
    "correlation": 0.3829530560640214
  }
}
Even without caching, the result is computed over a dataset of 2.8 million rows and sent back in less than a second. If you were to do this on the heap using regular Java HashMaps to store intermediate values, the Garbage Collector would have to run several times over the course of every query, slowing down computation significantly. With Speedment, it is all offheap.
You can get the sources for the article here.
Demo Database with 2.8 Million Rows
In the examples I used the Employees demo database for MySQL. It has more than 2.8 million rows of salary information that we are going to analyze. I have not made any changes to the database-side. I am only accessing it using Speedment.
Step 1: Creating the Project
To setup the project, I used the initializer on the Speedment website to generate a pom.xml-file.
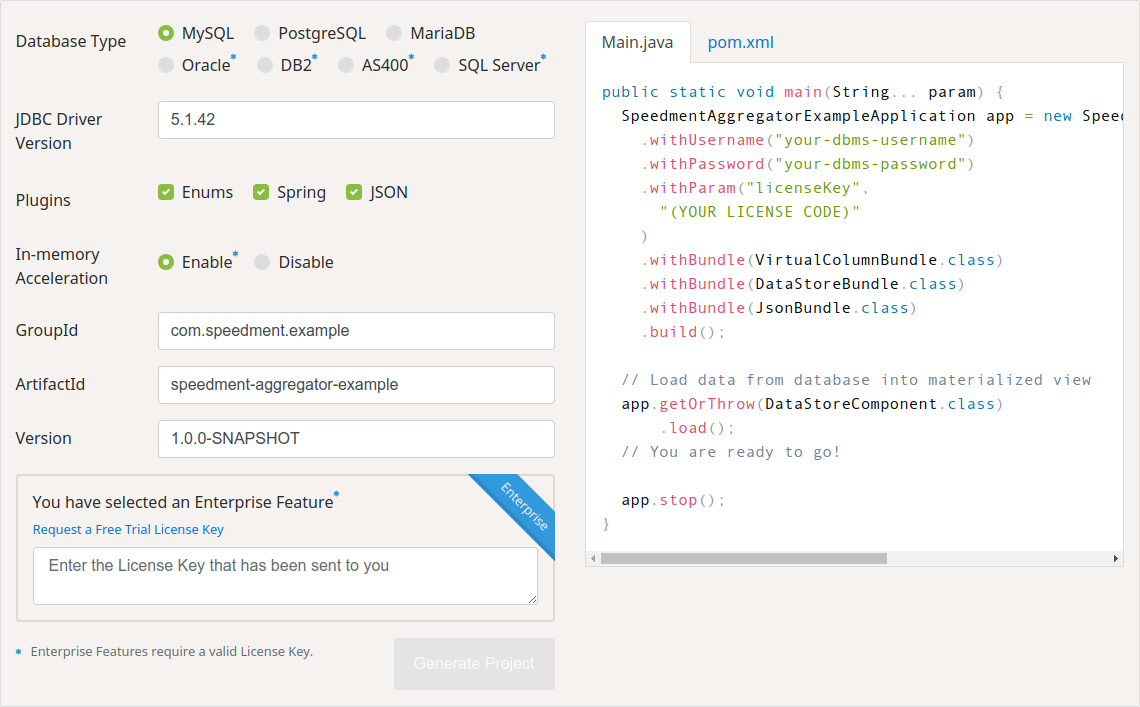
I selected “MySQL” as the Database Type, checked all the three “Plugins” and enabled “In-memory Acceleration”. On the right-hand side is a generated Main.java-file as well as a pom.xml-file. I am only going to use the pom.xml-file in this case. For the sake of keeping these examples short I also decided to manually add Project Lombok to the pom.xml to generate getters and setters automatically.
<dependency>
    <groupId>org.projectlombok</groupId>
    <artifactId>lombok</artifactId>
    <version>1.16.20</version>
    <scope>provided</scope>
</dependency>
Once I pasted the generated pom.xml file into an empty folder, I opened a shell window and ran:
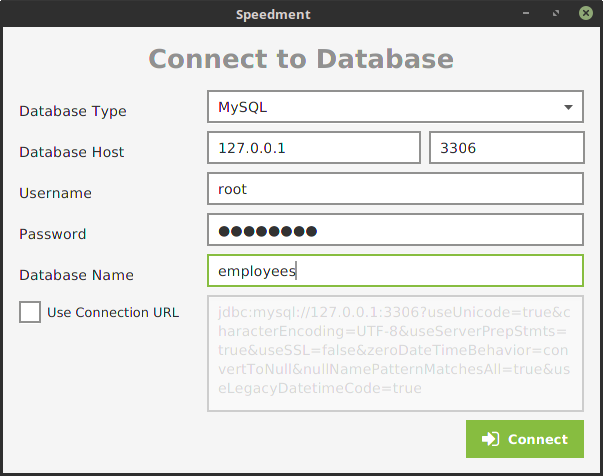
mvn speedment:tool
This Maven command is used to launch the Speedment Tool. This is a nice way to connect to the database and generate all entities, serializers, managers, etc in a user friendly way.
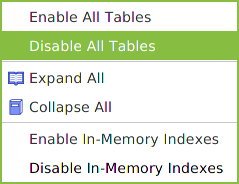
In the tool, I disabled all the tables except Salary. Tables can be disabled in bulk by right-clicking the “Schema” node in the tree and selecting “Disable All Tables”. The best way to limit the memory footprint of the application is to make sure you don’t pull more tables than necessary into memory.
We do need some piece of information about the Employees-table however to be able to analyze the salaries of different groups of employees. Normally, if you are using SQL, you would use a JOIN statement to achieve this. In Speedment however, you add something called Virtual Columns.
To create a Virtual Column, right-click the “Table” node in the tree and select “Add Virtual Column”.
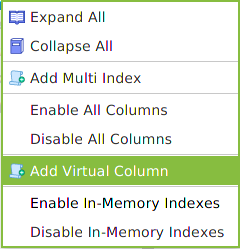
I added a total of two Virtual Columns, “gender” and “hire_date” to the “Salary” table. By doing this, I have defined a denormalized view containing both the Salary information as well as some information about the Employee. I am going to use this when computing the correlation.

The last step before we get to write our Java code is to press “Generate”.
The settings are automatically saved in a file called speedment.json when the “Generate”-button is pressed, so the tool can safely be closed afterwards.
Configuring Spring
Since I added the “Spring” plugin in the Initializer, the project has been configured to generate the basic classes needed to use Speedment in a Spring context. There is already a @Configuration annotated class that defines Spring beans for all the managers (in this case just the SalaryManager since we disabled the other tables).
The only thing we need to add to create a basic Spring application is a MainApp.java-file.
@SpringBootApplication
public class MainApp {
    public static void main(String... args) {
        SpringApplication.run(MainApp.class, args);
    }
}
If your database is running on a different host or has a password set, you probably need to add a Spring configuration file in the root of the project to let Speedment know how to access it. Here is an example of my application.yml-file:
server:
  port: 9001
spring:
  speedment:
    username: root
    password: password
That’s all the setup we need. Now we can start writing the actual business logic.
Step 2: Compute Mean Salary
The first thing to do, to get accustomed to the API, is to do a simple aggregation. I want to divide all salaries in the database based on the gender of the employee and then calculate the mean and count of each. So, I will create a Spring controller for this called SalaryMeanController.
@RestController
@RequestMapping("/salary/mean")
public class SalaryMeanController {

}
Great. Now, to access the in-memory view that Speedment builds automatically when Spring is loaded, we need a DataStoreComponent. Luckily, this can be autowired like this:
@RestController
@RequestMapping("/salary/mean")
public class SalaryMeanController {
    private @Autowired DataStoreComponent dataStore;
}
The DataStoreComponent is a component in Speedment that holds all the data pulled from the database. The same instance will live on for the duration of the program, even if the data is replaced. That is why we can use the @Autowire annotation to access it. However, while processing a request, we want to look at a single view of the data. To get an object that is immutable and that only contains the salary information in that moment, we need to retrieve the EntityStore<Salary>. I am going to create a helper method to access the current store so that I do not have to type it over and over again.
@RestController
@RequestMapping("/salary/mean")
public class SalaryMeanController {

    private final static TableIdentifier<Salary> TABLE =
        Salary.EMP_NO.identifier().asTableIdentifier();


    private @Autowired DataStoreComponent dataStore;
    private EntityStore<Salary> entityStore() {
        return dataStore.currentHolder().getEntityStore(TABLE);
    }
}
I can now call entityStore() whenever I want to access the current view of the data. The last thing I need to do before I can create the actual controller is to define a result-type. To keep this code short, I will use Lombok to generate its constructor and getters.
@Data
private static class Result {
    @JsonIgnore
    private final long ref;
    private long count;
    private double salaryMean;
}
The purpose of the Result class is to let Speedment know how the results are supposed to be delivered. We can design this any way we want. In addition to the count and salary values, I have decided to also store a long called “ref”. This is an internal Speedment reference that can be used to later go back and look at one of the entities that belong to each bucket. In our case, we will use this later to keep track of which Result refers to which gender. I have set the reference to final so that Lombok will include it in the constructor and also added the @JsonIgnore-annotation since I do not want this reference to be included in the final JSON result.
I am now ready to write the actual controller method. Speedment uses a builder pattern to define aggregations. The builder is decorated with one or more “keys” that define the buckets of the aggregation and one or more “operations” that define how values in the same bucket should be combined. I will set the key to the “gender” column and add two operations; “count” and “average”.
@GetMapping
Map<Salary.Gender, Result> get() {
    final EntityStore<Salary> store = entityStore();
    final Aggregator<Result> agg = Aggregator.builder(store, Result::new)
        .withEnumKey(Salary.GENDER)
        .withAverage(Salary.SALARY, Result::setSalaryMean)
        .withCount(Result::setCount)
        .build();


    // ...
}
The code above should be self explanatory. When the AggregatorBuilder is created, I define the store it should aggregate on and how the Result object defined earlier can be constructed from a Speedment reference. To finish the method, I need to invoke the aggregator on a stream of references and collect the result to a Map user a standard Java Collector.
return agg.aggregate(entityStore().references())
    .collect(toMap(
        result -> store.deserializeAny(result.ref, Salary.GENDER),
        Function.identity()
    ));
Collections.toMap is a regular Java collector that takes two functional references. For each result, it uses the first function to generate the “key” and the second to generate the “value”. Remember the “ref” value I stored in the Result object? It is used here to look up the gender of each bucket in the store.
The resulting JSON looks like this:
{
  "F": {
    "count": 1137726,
    "salaryMean": 63769
  },
  "M": {
    "count": 1706321,
    "salaryMean": 63838
  }
}
The cool thing with this is that the entire aggregation is performed off-heap. The Result objects you are seeing are only allocated once the result has already been computed. This is vital for achieving high performance when you want to aggregate huge datasets.
The finished SalaryMeanController can be seen here.
Step 3: Compute Salary Variances
So far I have only performed a quite simple single-pass aggregation. A more complex aggregation that can not be performed in a single pass is to calculate a variance or a standard deviation on the data. That is what I will show next.
To implement the variance controller, I begin by duplicating the SalaryMeanController from above and call it SalaryVarianceController.
@RestController
@RequestMapping("/salary/variance")
public class SalaryVarianceController {

    private final static TableIdentifier<Salary> TABLE = ... ;

    private @Autowired DataStoreComponent dataStore;

    @Data
    private static class Result { ... }

    @GetMapping
    Map<Salary.Gender, Result> get() { ... }
    private EntityStore<Salary> entityStore() { ... }
}
The Result object we defined earlier works fine for the first pass, but for the second pass we also want to store the variance. I am therefore going to create a second class called Result2.
@Data
private static class Result2 {
    @JsonIgnore
    private final long ref;
    private final long count;
    private final double salaryMean;
    private double salaryVariance;

    Result2(Result firstPass) {
        ref        = firstPass.ref;
        count      = firstPass.count;
        salaryMean = firstPass.salaryMean;
    }
}
Here I defined my own constructor so that I can copy values already computed from the previous result. The only value that needs to be computed in the second pass is the salary variance since I already have the mean and count from the first pass.
The controller method requires some modifications from the one used in SalaryMeanController. First, I should change the return type so that the new Result2-type is used instead of Result.
@GetMapping
Map<Salary.Gender, Result2> get() { ... }
The code computing the first pass remains the same so I won’t repeat it here. The interesting thing is the second pass. Instead of collecting the result stream immediately after aggregating the first pass, I inserted a .flatMap()-operation. It will be invoked once for each bucket produced by the first pass (so two times since we used gender as the key). The flatMap() will then return the Stream<Result2> to be collected.
.flatMap(previous -> {
    final Salary.Gender gender =
        store.deserializeAny(previous.ref, Salary.GENDER);

    return Aggregator.builder(store, ref -> new Result2(previous))
        .withEnumKey(Salary.GENDER)
        .withVariance(
            Salary.SALARY,
            previous.salary,
            Result2::setSalaryVariance)
        .build()
        .aggregate(genderFieldCache().equal(
            gender, Order.ASC, 0, Long.MAX_VALUE)
        );
    }
)
Inside the lambda, I look up which gender the bucket represents and use a new Aggregator to compute the variance. withVariance(...) is a convenience method that computes the squared difference from a mean. I simply input the mean computed in the first step and set the result just as previous. Instead of aggregating entityStore().references() like we did in the first step we use genderFieldCache().equal(...). This is a method we haven’t defined yet, but the reason why we don’t use the store in the second pass is that we want only rows with the same gender to be included.
The method genderFieldCache() is also very simple.
private FieldCache.OfEnum<Salary.Gender> genderFieldCache() {
    return dataStore.currentHolder().getFieldCache(
        Salary.GENDER.identifier()
    );
}
If I now run the application and access the new controller, I get this:
{
  "F": {
    "count": 1137726,
    "salaryMean": 63769,
    "salaryVariance": 283750106.3594864
  },
  "M": {
    "count": 1706321,
    "salaryMean": 63838,
    "salaryVariance": 287120292.49482954
  }
}
The finished SalaryVarianceController can be seen here.
Step 4: Compute Correlation Between Salary and Employment Days
Looking at means and variances is one thing, but a much more powerful statistical tool is comparing two columns to see if there is a linear correlation. The goal of the fourth step of this article is to compute Pearson’s correlation coefficient between the salary of an employee and the number of days they have been employed. Computing the coefficient requires not only two passes, but also a way to express cross-column operations. Speedment supports this by using the Aggregations utility class.
First, I copy the SalaryVarianceController and name it SalaryCorrelationController.
@RestController
@RequestMapping("/salary/correlation")
public class SalaryCorrelationController { ... }
The first obstacle working with the Salary table is that there is no column called “days_employed”. The closest thing is the two dates “from_date” and “hire_date”. Before I can calculate the correlation, I therefore need to create a custom “deserializer” that computes the difference between the epoch seconds of these two dates and then multiplies it with a constant to get the difference in days rather than seconds. I created this deserializer as a static variable called DAYS_EMPLOYED so that I do not have to repeat myself.
private final static int SECONDS_IN_A_DAY = 86_400;
private final static DeserializeDouble<Salary> DAYS_EMPLOYED =
    multiply(
        minus(
            getAsLongOrElse(Salary.FROM_DATE, 0),
            getAsLongOrElse(Salary.HIRE_DATE, 0)
        ).asDeserializeDouble(),
        constant(1d / SECONDS_IN_A_DAY)
    );
Note that many of the methods used above must be imported statically from:
com.speedment.enterprise.datastore.runtime.aggregator.Aggregators.
I also need to modify the Result2 class we created in Step 3 so that it also stores the mean and variance of the days employed. I also added two additional double values to store the covariance and correlation. The covariance is only needed to compute the correlation, so I excluded it from the JSON with the @JsonIgnore-annotation.
@Data
private static class Result2 {
    @JsonIgnore
    private final long ref;
    private final long count;
    private final double salaryMean;
    private final double daysEmployedMean;
    private double salaryVariance;
    private double daysEmployedVariance;

    @JsonIgnore
    private double covariance;
    private double correlation;

    Result2(Result firstPass) {
        ref              = firstPass.ref;
        count            = firstPass.count;
        salaryMean       = firstPass.salaryMean;
        daysEmployedMean = firstPass.daysEmployedMean;
    }
}
For the get()-method, I begun by modifying the Aggregator so that it also computes the mean days of employment in the first pass. The actual computation will be done using the static variable DAYS_EMPLOYED defined earlier.
@GetMapping
Map<Salary.Gender, Result2> get() {
    final EntityStore<Salary> store = entityStore();
    final Aggregator<Result> agg = Aggregator.builder(store, Result::new)
        .withEnumKey(Salary.GENDER)
        .withCount(Result::setCount)
        .withAverage(Salary.SALARY, Result::setSalaryMean)
        .withAverage(DAYS_EMPLOYED, Result::setDaysEmployedMean)
        .build();

    ...
}
The next thing to do is to modify is the second pass aggregation performed inside the .flatMap(). In addition to computing the variance of the salary and days of employment, I also need to compute the covariance in this step. I need this value later to compute the correlation coefficient.
.flatMap(previous -> {
    final Salary.Gender gender =
        store.deserializeAny(previous.ref, Salary.GENDER);

    return Aggregator.builder(store, ref -> new Result2(previous))
        .withEnumKey(Salary.GENDER)
        .withVariance(
            Salary.SALARY,
            previous.salaryMean,
            Result2::setSalaryVariance)
        .withVariance(
            DAYS_EMPLOYED,
            previous.daysEmployedMean,
            Result2::setDaysEmployedVariance)
        .withAverage(covariance(
                previous.salaryMean,
                previous.daysEmployedMean
            ), Result2::setCovariance)
        .build()
        .aggregate(genderFieldCache().equal(
            gender, Order.ASC, 0, Long.MAX_VALUE)
        );
    }
)
The third operation is a new one. It uses a utility method called covariance(double, double) that is not defined yet to compute the covariance with two precalculated means. It is implemented like this.
private DeserializeDouble<Salary> covariance(
        double salaryMean,
        double daysEmployedMean) {
    return multiply(
        minus(
            getAsDouble(Salary.SALARY),
            constant(salaryMean)
        ),
        minus(
            DAYS_EMPLOYED,
            constant(daysEmployedMean)
        )
    );
}
This is a good example of how the small building blocks of the Aggregators-class can be combined to create powerful statistics.
The final thing I need to add to the get()-method is to compute the correlation once the result stream is produced. I can do this with a regular Stream.map()-operation.
.map(result -> {
    if (result.salaryVariance == 0
    ||  result.daysEmployedVariance == 0) {
        result.setCorrelation(Double.NaN);
    } else {
        result.setCorrelation(
            result.covariance / (
                Math.sqrt(result.salaryVariance) *
                Math.sqrt(result.daysEmployedVariance)
            )
        );
    }
    return result;
})
All the values have now been set, so the collecting should work just as before. Rerunning the application and querying /salary/correlation, I now see this:
{
  "M": {
    "count": 1706321,
    "salaryMean": 63838,
    "daysEmployedMean": 2562.9950696092446,
    "salaryVariance": 287120292.49482954,
    "daysEmployedVariance": 2521092.66062704,
    "correlation": 0.38346220360987127
  },
  "F": {
    "count": 1137726,
    "salaryMean": 63769,
    "daysEmployedMean": 2562.467887479722,
    "salaryVariance": 283750106.3594864,
    "daysEmployedVariance": 2515737.630249606,
    "correlation": 0.3829530560640214
  }
}
As you can see, there is a positive trend that the salary of both groups seems to be correlating with the number of days employed. The correlation is still quite weak since the Employees-database is a generated database, so feel free to try it yourself on your own numbers!
Summary
Over the course of this article, you have learned how to do in-memory off-heap aggregations on a relational database using Speedment. I have shown you how to compute the mean and variance of a column, compute the mean and variance of an expression over two columns and also how to compute Pearson’s correlation coefficient between the two.
All the sources for this article can be found here. You can get a free trial of Speedment Enterprise using the Initializer on the Speedment website if you want to try it out yourself.
Until next time, keep coding!